Info
Students can connect remotely to broadcast courses at USU using an application called CMA. CMA runs through the Google Chrome browser and does not require a download. This page will guide you through the process of connecting to class.
IVC Support Faculty Information
Classroom Support
Faculty and students can visit classroomsupport.usu.edu (wherever they may be located) for immediate assistance, to report and issue, or to leave feedback on their classroom experience (with equipment or their facilitator).
MATS Instructions******
Facilitator Support
Facilitators may occasionally need to reach out for additional support. They'll usually use a live chat system to get support when needed. If an issue arises, know that facilitators will most likely not call someone to get support but will instead be chatting with support. We’ve found live chat to be less intrusive to classes and allow us to better support all courses.
Electronic Material Distribution and Returns
Are you more of a visual learner? Watch the video found at http://www.kaltura.com/tiny/0gbmq to learn how we use Box to return in-class exams and homework to you along with how you can return graded materials back to students.
If you would like paper-based homework and in-class exams electronically sent to you, they will be sent to you through a Box folder which will be created and shared with you each semester. The folder will be named: “Instructor Name_Returned Course Materials_SP20.” USU Testing Centers across the state follow the same process and use the same Box folder to return paper-based exams to instructors.
Returning Graded Materials to Statewide Campuses
If you need to return graded, paper-based exams or homework to students, there are two options available to you:
- Option 1: Mark up the files digitally or by hand, then upload them into SpeedGrader on Canvas by following these instructions:
- Open the assignment/exam in Canvas, then select SpeedGrader from the right of the page.
- Select the appropriate student. In the comments, attach the file, add any additional comments, then a grade.
- Option 2: Upload the exams to the location folders in the “SP20 IVC Course Material Returns” folder in Box. All instructors with a USU Box account who are teaching an IVC broadcast course this semester have been given uploader access to this folder. If you have not been given access to the folder, and need access, contact your facilitator or email Sean at sean.peterson@usu.edu. To return graded materials through Box:
- Open the “SP20 IVC Course Material Returns” folder in Box.
- Upload the graded materials to the appropriate location by placing it in that location’s folder (e.g. Vernal, Price, Logan, etc.). (Note that once uploaded, you will be unable to view or delete the file. If you need a file delected, contact your facilitator or email Sean at sean.peterson@usu.edu.
- Statewide Campuses will check their folders each day for returns and will print them out for students.
Quality Checks
Quality checks are performed periodically in broadcast classes at USU to help provide faculty and students with a great broadcast experience. These may be done in-room or remotely. In-room quality checks are performed in Logan broadcast courses once every 5-6 weeks and involve an employee (who wears a lanyard and badge) dropping in and monitoring a class for approximately 5-10 minutes. Remote quality checks are less intrusive and involve an employee remotely monitoring a class for approximately 5-10 minutes. These remote quality checks do not interfere with classes (i.e. an additional location does not appear on the screen for you or your students).
When performing both in-person and remote quality checks, an employee fills out a Qualtrics form that includes questions like:
- How is the camera shot quality of the originating and receive locations (good, poorly framed, unfocused, etc.)
- Is the Logan facilitator wearing their facilitator badge?
- Does the facilitator appear to be meeting the needs of the class?
- Are there comments or tips that could benefit the originating facilitator?
Upon completing the form, an email is automatically generated and emailed to the facilitator of the class. The email contains a report that provides the facilitator of the class with feedback on how they are doing (both things they may be doing great at and advice on what could help them do even better).
Please note that faculty and the content of a course are not evaluated by these quality checks. Quality checks are performed simply with the intent to ensure faculty and students are being provided with a great experience and to look for ways where we can improve that experience and provide feedback to facilitators.
If you do not want these quality checks performed in your course(s), that is completely fine. Simply email Sean Peterson at sean.peterson@usu.edu and include the course(s) you do not want these quality checks performed in.
Additional Resources
Change of Origination Request Classroom Tech Training Resources Kaltura Scheduling Request
Troubleshooting
- If after clicking "Join meeting as a guest" you get an error, try clicking it a second time.
- If on the settings page you click "Join Meeting" and are unable to join, you may have accidentally blocked your webcam and microphone. If the site doesn't recognize your webcam or microphone, you won't be able to connect. Try the following:
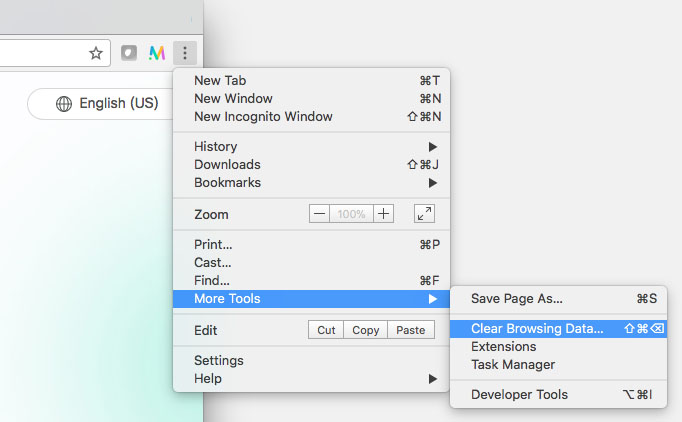
- In Google Chrome, open the "Clear Browsing Data" menu by clicking on the three dots at the top right, selecting "More Tools and "Clear Browsing Data."
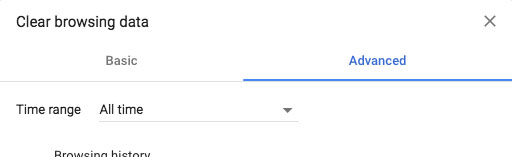
- Select the "Advanced" tab and change the "Time range" to "All time."
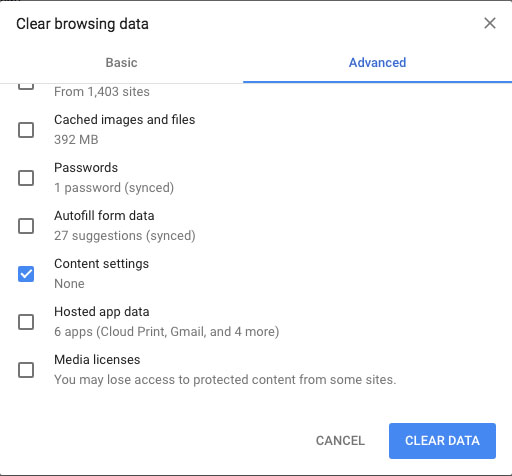
- Check the box next to "Content settings" then click "Clear Data."
- Open the link for your course in Google Chrome.
- Type in your name and select "Join meeting as a guest."
- A pop up may appear asking you to "Show notifications." Click Allow.
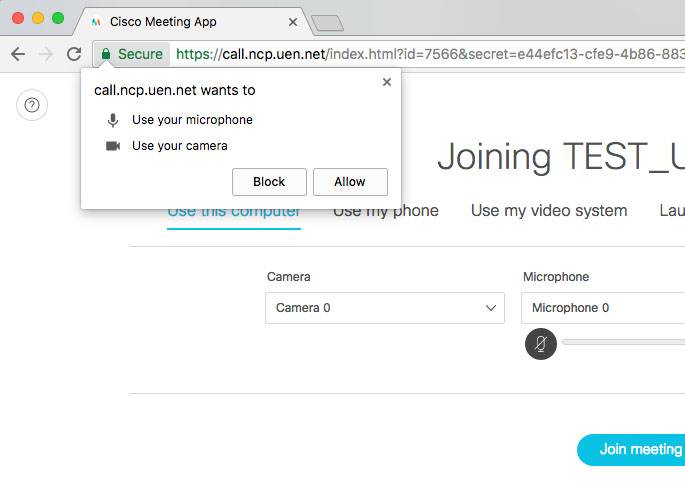
- Another pop up will appear asking to use your microphone and camera. Click Allow.
- You should now be able to verify your camera, microphone, and speakers are working correctly, then click "Join Meeting."
- In Google Chrome, open the "Clear Browsing Data" menu by clicking on the three dots at the top right, selecting "More Tools and "Clear Browsing Data."
- Ensure Hardware Acceleration is disabled in Google Chrome. Instructions for disabling this can be found in the "Requirements and Preperation" section on this page.
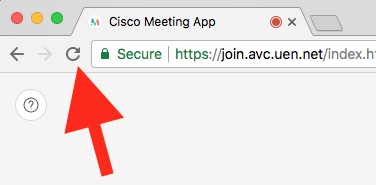
- Refresh the page by pressing the page refresh button in Google Chrome. If video still doesn't show, try refreshing the page again.
- Ensure Hardware Acceleration is disabled in Google Chrome. Instructions for disabling this can be found in the "Requirements and Preparation" section on this page.
- You may be using or have used another application that has locked the camera and is not letting other applications, like CMA, use it. Other video conferencing applications like Skype may do this. Ensure other applications that may be using the camera are closed. If all applications are closed and the camera is still not working, try restarting your computer.
- You may have accidentally blocked your webcam from CMA. Try the following:
- In Google Chrome, open the "Clear Browsing Data" menu by clicking on the three dots at the top right, selecting "More Tools and "Clear Browsing Data."
- Select the "Advanced" tab and change the "Time range" to "All time."
- Check the box next to "Content settings" then click "Clear Data."
- Open the CMA link for your event in Google Chrome.
- Type in your name and select "Join meeting as a guest."
- A pop up may appear asking you to "Show notifications." Click Allow.
- Another pop up will appear asking to use your microphone and camera. Click Allow.
- You should be able to see a preview of your camera. Verify your camera, microphone, and speakers are working correctly, then click "Join Meeting."
- In Google Chrome, open the "Clear Browsing Data" menu by clicking on the three dots at the top right, selecting "More Tools and "Clear Browsing Data."
- Some older webcams may not work with the system. Try using a different webcam if possible.
This is most likely caused by low bandwidth on your network or, depending on the age of your computer and your processor, your computer may be having a hard time keeping up. The following suggestions may help:
- Other internet connected devices/services can significantly decrease your network speed (e.g. Gamining Consoles, iPads, Netflix, etc.). Ensure these devices/services are not in use during the conference.
- Check your internet speed at http://speedtest.uen.net/. If you don't have at least 2 Mbps upload and 2 Mbps download, we recommend going somewhere with a faster internet connection. 2 Mbps up and down is recommended.
- Close out of any other applications you may have open on your computer. This will free up more resources for your video conference connection.
A hard-wired connection will be more stable and reliable than a wireless network, even if the wireless network is faster then the hard-wired network. Wireless network speeds often change based on how many people are on the same wireless network.
As long as the hard-wired connection meets the network requirements listed on this page, we recommend using the hard-wired connection for the best quality and experience.