Info
Students can connect remotely to broadcast courses at USU using an application called CMA. CMA runs through the Google Chrome browser and does not require a download. This page will guide you through the process of connecting to class.
Common Issues and Solutions
Please note that some solutions require access to systems that are only accessible by full-time technicians.
Solutions that require additional access will be marked with a .
Video Issues
Camera Issues
No Video Coming From Camera
Try toggling between the student camera and the instructor camera if there are multiple cameras in the room. Otherwise, see below:
- Camera can be controlled/moved with remote or Xpanel
- Likely an issue with an HDMI extender.
- Try unplugging the HDMI cable from the camera, wait a few seconds, then plug it in.
- Power cycle the HDMI extender.
- The HDIM extender's power supply may be bad. Try swapping it with a new power supply.
- Camera cannot be controlled by remote or Xpanel
- If in a room with an SX80, check the camera status by webbing into the codec under Configuration then Status. If camera status shows as "false," reboot the codec.
- Power cycle the camera by unplugging the power cable from the back of the camera, waiting 10 seconds, then plugging it back in. Note that cameras can take 1-3 minutes to fully power on.
Camera Cannot Be Controlled (Moved)
- Try toggling between the student camera and the instructor camera if there are multiple cameras in the room.
- Ensure a camera speed is selected on the Camera Controls page on the Xpanel / touch panel.
- If connected to an SX80, check the camera status by webbing into the cocec and selecting "System Status" under the Configuration tab. If the status of the camera (usually camera 1 or camera 2) shows "False" the codec is not communicating with the camera. Try restarting the SX80.
- Reboot the camera by unplugging the power cable for 10 seconds then plugging it back in. Note that cameras can take 1-3 minutes to fully power on.
Camera Image is Distorted
- Unplug the HDMI or video cable from the camera, wait 5 seconds, plug it back in.
- If that doesn't work, unplug the power cable from the camera for 10 seconds then plug back in. Note that cameras can take 1-3 minutes to fully power on.
Present Source Issues
The Presentation Source "Flickers" (Rapidly or Every Now and Then) at Receive Locations.
In the event settings in TMS, the Content Mode for the event needs to be changed from "Hybrid" to "Transcoded." Once changed, the originating site will need to restart the presentation source.
If you don't have access to TMS or can't find the event settings, call the TSSC at 1-800-863-3486, Option 1, Option 1. They can fix this.
The Present Source is Blurry
- Check the presentation source's quality setting at the originating location.
- If the Crestron touch panel at the originating site has a Motion/Sharp button near the lower right corner of the screen, ensure that it shows "Sharp." If it says "Motion," press to switch to "Sharp."
- If the touch panel does not have a Motion/Sharp button, the setting can be checked/changed by webbing into the codec.
- Once webbed into the codec, go to System Configuration under the "Configurations" tab.
- Select "Video" from the left hand menu.
- Find the presentation input (usually input 3 and usually labeled "PC").
- Change the quality to "Sharp."
- If changing the quality setting does not help it may be a network issue. Are all sites seeing a blurry presentation? If only a couple are, it's most likely an issue with their network. Call the TSSC.
Codec Shows it is Sending Presentation But In Reality, It's Not or It Sends a Blank Source
- Double check the correct present source is selected on the Crestron Touch Panel. Try toggling between another present source then back.
- Web into the codec to confirm the present source has been started and is being sent out.
- Reboot the codec.
Other Video Issues
No Video on TV or Monitor
- Check that the monitor is powered on.
- Try toggling between Teach IVC and Receive IVC (this ensures the DMPS is routing the correct video source to the monitors).
- Check the input of the TV or monitor. TV's should usually be set to HDMI 1.
- Turn off the TV or monitor and power cycle it by unplugging if from power for 10 seconds then plugging it back in.
Laptop Does Not Show Up Anywhere When Plugged Into System
- Check the display settings on the laptop. It should be set to duplicate or extend, based off the instructor preferences.
- Change the laptop resolution to 1920x1080.
- Unplug the laptop cable (including adapter if applicable) from the laptop. Wait 5 seconds and plug it back in.
- Restart the laptop.
- Restart the laptop interface if possible.
- Use the Classroom PC if none of the solutions above help.
Laptop Shows Up On Local Monitor But Not For Sites (It Shows A Black Screen On The Codec)
- Unplug the laptop cable (including adapter if applicable) from the laptop and restart the laptop.
- Once restarted, plug the laptop cable back into the laptop.
- Check if the room has a Monoprice Splitter between the present source and the codec. (Follow the cable going into the present source input on the codec. It will usually be plugged into a Monoprice Splitter if there is one.) If there's not a Monoprice Splitter, install one.
- Use the Classroom PC.
Audio Issues
Microphone Issues
Shure Wireless Microphone Not Working
- Double check the following items:
- The All Mute (codec mute) is not muted.
- The microphone is on and not muted on the battery pack.
- The battery is not dead.
- There is a switch on the side of the battery pack (it may be covered with tape). If it is covered with tape, we shouldn't need to worry about it but that switch should be set to "mic" in most rooms. If on a different setting (0 or -10) the microphone will be very quiet and most likely won't be heard.
- Check to ensure the Group and Channel on the microphone battery pack is the same as the Group and Channel on the Shure microphone receiver.
Shure Wireless Microphone Cuts In and Out
- Ensure the microphone battery pack is not next to a cell phone or other wireless device. Wireless frequencies from other devices can occasionally affect the wireless microphone.
- Ensure the microphone cable is plugged into the battery pack securly.
- The microphone cable may have a short in it and need to be replaced. Place the battery pack on a desk somewhere it won't be moved. Move around the cable and see if the microphone cuts out when moving the cable around. If so, try replacing the cable.
- The power supply of the Shure microphone receiver may have gone bad. If thisi s the case, one can usually tell by looking at the front of the Shure microphone receiver, normally located underneath the instructor desk. If the green display on the front of the receiver flickers when speaking in the wireless microphone and/or the audio level on the receiver jumps up into the red sporadically, the power supply of the receiver is bad and needs to be replaced
Shure Wireless Microphone Has Static
- Double check that the static is not coming from somewhere else.
- If the microphone is a barrel mic (in the shape of a barrel, not a rectangle), ensure the top of the microphone is screwed in fully (it's rare, but sometimes it get's loose).
- The microphone cable may have a short in it and need to be replaced. One can usually tell if the cable has a short by running one's fingers slowly up or down the cable. If static is heard, it's most likely a bad cable and needs to be replaced.
- The power supply of the Shure microphone receiver may have gone bad. If thisi s the case, one can usually tell by looking at the front of the Shure microphone receiver, normally located underneath the instructor desk. If the green display on the front of the receiver flickers when speaking in the wireless microphone and/or the audio level on the receiver jumps up into the red sporadically, the power supply of the receiver is bad and needs to be replaced.
Other Audio Issues
No Audio From Sites But Audio From Other Sources Like the PC Works.
- Check the codec volume. It may have been turned down.
- If the room has a Cisco remote or a white Cisco touch panel, the codec volume can be adjusted with the volume controls on the remote or Cisco touch panel.
- Otherwise, get help through Spark or by calling the TSSC.
- Try toggling between Teach IVC and Receive IVC if in a room with a touch panel or XPanel.
- Reboot codec.
No Audio in Classroom (From Sites or Other Sources Like the PC).
- Check the room volume. Make sure it is not muted and turned up to an appropriate level (usually around 70%).
- Try toggling between Teach IVC and Receive IVC if in a room with a touch pane or XPanel.
- Reboot the audio mixer.
- Reboot the DMPS.
No Audio Coming Out of the Classroom Computer.
- Check the room volume on the touch panel and ensure it is not muted and it is turned up.
- Check the computer's volume level in the taskbar (the lower left hand corner of the screen). Make sure it is not muted and is at at least 70%.
- Check the video's volume (the volume of YouTube, etc.).
- Ensure the correct playback device is selected.
- Right click on the Speakers icon in the notifications (in the lower right of the screen).
- Select "Playback devices."
- Switch to a different source (laptop or document camera), then back to PC on the touch panel. This will ensure the DMPS and mixer are routing audio correctly.
- Try a different video (it may be an issue with the video).
- Ensure the audio out cable coming out of the computer is plugged securly into the computer.
Echo Coming From Location
- Some echoes can be caused by open michrophones at a site. Ask sites to mute their microphones when not needed. Echoes caused by open microphones often are not too intense but can be very distracting.
- Echos/feedback can be caused by a double connection (a location is connected twice to an event).
- Once the location that is causing the echo is found, web into the codec and go to the Call Control tab.
- If two connections are shown, disconnect one of them.
- If there isn't a double connect, try the suggestions below.
- The classroom computer may be sending out the echo that everyone hears.
- On the classroom computer, right click on the speaker icon in the notification area in the bottom right of the screen.
- Select "Playback Devices."
- Double click on the default playback device to open up it's properties.
- Go to the "Levels" tab.
- If you see three levels in the "Levels" tab, ensure the bottom two levels are mute. If one of these is unmuted, the computer will cause an echo that will be heard by everyone. The top level should be unmuted.
Sites Audio is Soft
- Turn up the Room Volume on the Xpanel / Touch Panel.
- If all sites are soft, the codec volume may have been turned down to a lower setting. The codec volume should not be changed in most rooms but sometimes it gets changed and needs to be adjusted. Adjust the codec volume by webbing into the codec and adjusting the volume in the "Call Control" tab, or by using the volume controls on the Cisco codec remote or Cisco touch panel.
- Site volume still low? Try restarting the mixer then the Crestron processor.
Originating Site's Audio is Cutting In and Out
- This could be caused by the Flickering Presentation Issue. Is the presentation flickering at the receive sites? Sometimes the presentation doesn't flicker but it's still the flickering presentation issue. If this is the case, receive sites will not only hear the instructor cut in and out, there will also be some popping/crackling noises as well. In TMS, try switching the Content Mode to Transcoded.
- If it's not caused by the Flickering Presentation Issue, it could be something with the instructor's microphone. Take a look at the microphone issues and solutions above.
IVC Connection Issues
A Codec at a Location Does Not Connect to an Event
- Try connecting the codec from TMS or CMM.
- If that doesn't work, try to web into the codec.
- If the codec can't be webbed into, have someone at the location hard reset the codec then try webbing into it again. If the codec still can't be webbed into, look into moving rooms.
- If the codec can be webbed into, follow steps below.
- Try calling out from codec to the event.
- ...not yet finished.
Several or All Sites Disconnect From An Event
Most likely caused by a bridge issue.
- Try reconnecting sites on CMM.
- Call the TSSC.
Other Issues
Panopto/Kaltura Issues
An Error Comes Up When Attempting to Record
The T (Thaw) Drive, where recordings are saved to, may be full. Delete a few of the oldest recordings in the T drive. Don't delete recent recordings in case they are needed as a backup.
Other Issues
Xpanel Not Connecting
If both the Touch Panel and Xpanel are not working, the DMPS most likely needs to be power cycled. If the Touch Panel is working but the Xpanel is not working, follow these steps:
- Check the internet connection on the facilitator computer (can they access websites like www.usu.edu in a browser?).
- If the computer has no internet (cannot access other websites) try restarting the computer. Some facilitator computers use wireless adapters that sometimes disconnect. Restarting the computer will usually get them working again.
- If restarting the computer doesn't work, the network registration of the computer may have expired and may need to be renewed.
- If the facilitator computer's internet connection appears to be working, the network registration of the DMPS may have expired and may need to be renewed.
Crestron Touch Panel Freezes or is Sluggish
- Restart the DMPS and wait a few minutes for it to power up.
- If after 3-5 minutes it's still not working, Try rebooting the touch panel by unplugging it's network cable from the back of the touch panel or from the switch.
80" Sharp Touch TV does not regonize touch.
- The Sharp Touch TVs are connected to the classroom computers through USB using a USB extender (called a "Black Box"). Unplug the USB extender from the back of the PC or from the USB hub. Plug it back in after a few seconds.
- If not sure which USB cable goes to the USB extender, unplug all the USBs from the computer and/or USB hub except for the blue USB cables. After a few seconds, plug them back in.
- If the above instructions don't do the trick, try restarting the computer.
Issue 3
text here
Site Specific Issues
Who you gonna call?
Ephraim
If facilitators in Ephraim are experiencing issues that we are unable to solve, have them contact their technician, Ryan Egan on his cell at 321-432-0265.
Kaysville
If facilitators in Kaysville are experiencing issues that we are unable to solve, have them contact one of their technicians, Doug Ede or Doug Nakken.
Price
If facilitators in Price are experiencing issues that we are unable to solve, have them contact one of their their technicians, Dee Miller or Steve Prettyman.
Salt Lake City
If facilitators in SLC are experiencing issues that we are unable to solve, have them contact one of their technicians, McKay Bowman or Ryan Egan.
Tooele
If facilitators in Tooele are experiencing issues that we are unable to solve, have them contact their technician, Hayden Bell.
Uintah Basin (Roosevelt & Vernal)
If facilitators in the Uintah Basin are experiencing issues that we are unable to solve, have them contact their technician, Chris Marley.
Issues
Issue
Issue 1
Who to call...
Issue 2
Text
Issue 3
Text
Troubleshooting
- If after clicking "Join meeting as a guest" you get an error, try clicking it a second time.
- If on the settings page you click "Join Meeting" and are unable to join, you may have accidentally blocked your webcam and microphone. If the site doesn't recognize your webcam or microphone, you won't be able to connect. Try the following:
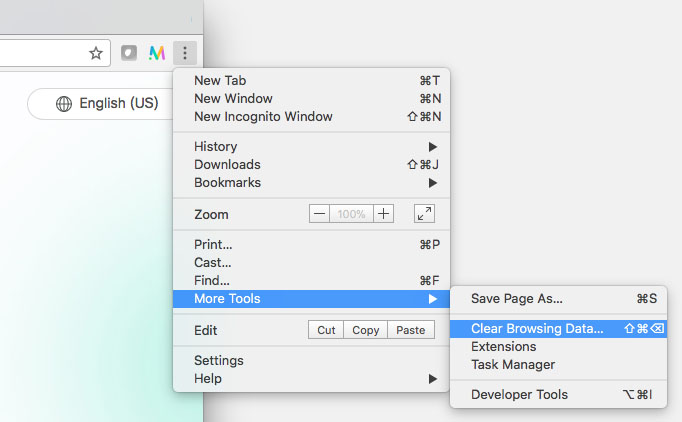
- In Google Chrome, open the "Clear Browsing Data" menu by clicking on the three dots at the top right, selecting "More Tools and "Clear Browsing Data."
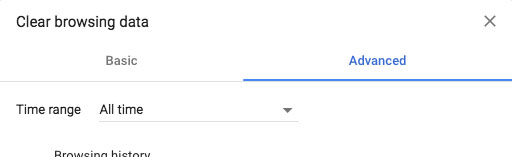
- Select the "Advanced" tab and change the "Time range" to "All time."
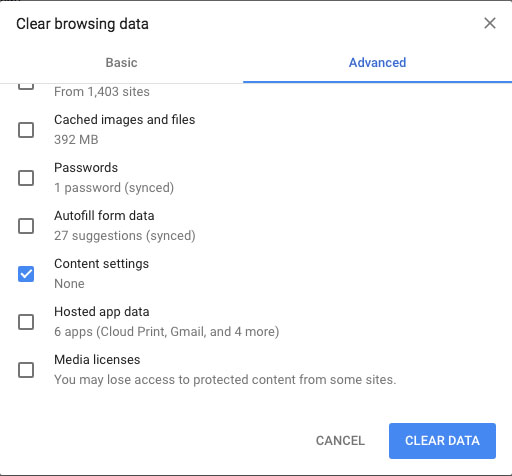
- Check the box next to "Content settings" then click "Clear Data."
- Open the link for your course in Google Chrome.
- Type in your name and select "Join meeting as a guest."
- A pop up may appear asking you to "Show notifications." Click Allow.
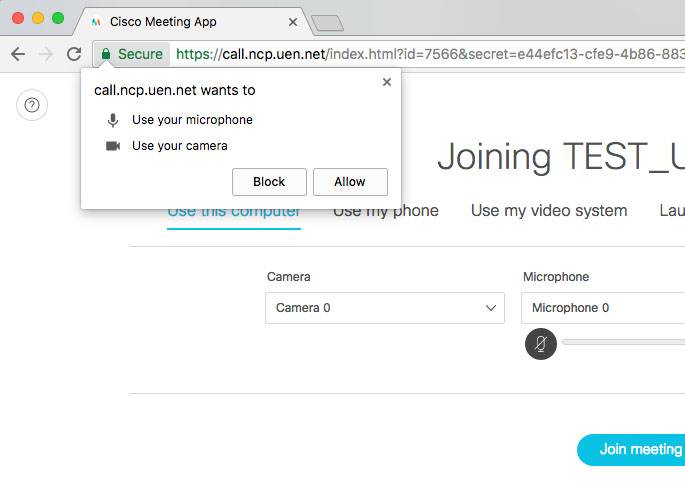
- Another pop up will appear asking to use your microphone and camera. Click Allow.
- You should now be able to verify your camera, microphone, and speakers are working correctly, then click "Join Meeting."
- In Google Chrome, open the "Clear Browsing Data" menu by clicking on the three dots at the top right, selecting "More Tools and "Clear Browsing Data."
- Ensure Hardware Acceleration is disabled in Google Chrome. Instructions for disabling this can be found in the "Requirements and Preperation" section on this page.
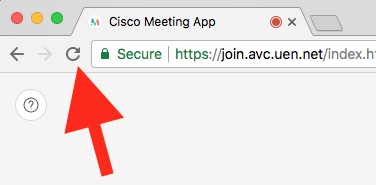
- Refresh the page by pressing the page refresh button in Google Chrome. If video still doesn't show, try refreshing the page again.
- Ensure Hardware Acceleration is disabled in Google Chrome. Instructions for disabling this can be found in the "Requirements and Preparation" section on this page.
- You may be using or have used another application that has locked the camera and is not letting other applications, like CMA, use it. Other video conferencing applications like Skype may do this. Ensure other applications that may be using the camera are closed. If all applications are closed and the camera is still not working, try restarting your computer.
- You may have accidentally blocked your webcam from CMA. Try the following:
- In Google Chrome, open the "Clear Browsing Data" menu by clicking on the three dots at the top right, selecting "More Tools and "Clear Browsing Data."
- Select the "Advanced" tab and change the "Time range" to "All time."
- Check the box next to "Content settings" then click "Clear Data."
- Open the CMA link for your event in Google Chrome.
- Type in your name and select "Join meeting as a guest."
- A pop up may appear asking you to "Show notifications." Click Allow.
- Another pop up will appear asking to use your microphone and camera. Click Allow.
- You should be able to see a preview of your camera. Verify your camera, microphone, and speakers are working correctly, then click "Join Meeting."
- In Google Chrome, open the "Clear Browsing Data" menu by clicking on the three dots at the top right, selecting "More Tools and "Clear Browsing Data."
- Some older webcams may not work with the system. Try using a different webcam if possible.
This is most likely caused by low bandwidth on your network or, depending on the age of your computer and your processor, your computer may be having a hard time keeping up. The following suggestions may help:
- Other internet connected devices/services can significantly decrease your network speed (e.g. Gamining Consoles, iPads, Netflix, etc.). Ensure these devices/services are not in use during the conference.
- Check your internet speed at http://speedtest.uen.net/. If you don't have at least 2 Mbps upload and 2 Mbps download, we recommend going somewhere with a faster internet connection. 2 Mbps up and down is recommended.
- Close out of any other applications you may have open on your computer. This will free up more resources for your video conference connection.
A hard-wired connection will be more stable and reliable than a wireless network, even if the wireless network is faster then the hard-wired network. Wireless network speeds often change based on how many people are on the same wireless network.
As long as the hard-wired connection meets the network requirements listed on this page, we recommend using the hard-wired connection for the best quality and experience.