Helpful Room Hints
A key is required to get into this room. Please pick up the key from the office (DE 101) and return it after class.
Microphone Batteries
You will need to grab the microphone batteries from DE 101. Grab 4 batteries and make sure they are labeled with EBLS. There are other batteries, not labeled, that will not work with the microphones on the cart.Room Set Up
- Go to DE 101 and grab 4 batteries (marked EBLS) and the “EB Mobile” keys out of the key box.
Note: You will need your key box code to get into the key box. You will need to get out your phone and open the connect team app. On the bottom click on the “profile” button. Under “more” you will see “personal information”, click on that and scroll down until you see “key code”. That 5-digit number will unlock the key box for you. If you code is 12345 you will enter “12345#”. You will need to put the pound button at the end or else the key box won’t open for you. - Walk over to EBLS. You will enter through the west side door (located by the statue between EDUC and EBLS). The door should be unlocked but if you can’t get in, message on the logan-facilitators channel and we will send a lead over to help you get into the building.
- Walk to Room 138 and use the corresponding key to unlock the closet. Once you remove the mobile cart from the closet, make sure you have the keys and close the closet. Move the mobile cart to your assigned room, either Room 134 or the Gym.
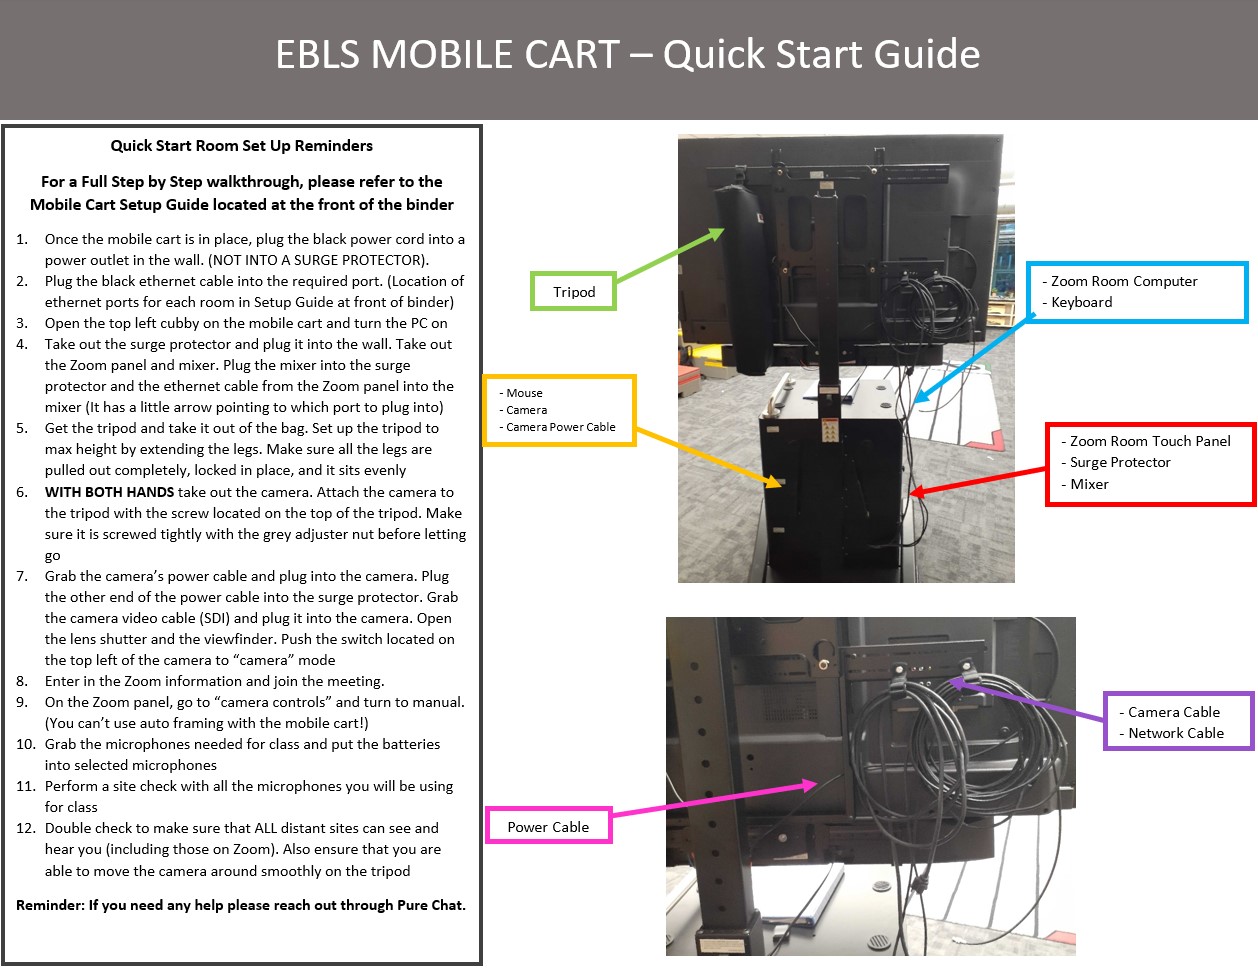
- Once the mobile cart is in place, plug the black power cord (attached with Velcro on the back left side of the TV) into a power outlet in the wall. (NOT INTO A SURGE PROTECTOR).
- Plug the black ethernet cable (also found on the back right side of the TV attached with Velcro) into the port. (Location of ethernet ports – Room 134: above the middle of the counter by the whiteboard. GYM: in the cupboard near the gym office there will be a port attached with Velcro to the bottom. An arrow will point to the correct port).
- Open the top left cubby on the mobile cart and turn the PC on.
- Take out the surge protector (bottom left cubby) and plug it into the wall. Take out the Zoom panel and mixer (bottom left cubby). Plug the mixer into the surge protector and the ethernet cable (attached to the back of the Zoom panel) into the mixer. It has a little arrow pointing to which port to plug into.
- Get the tripod (hanging on the back top left of mobile cart) and take it out of the bag. Set up the tripod to max height for best results by extending the legs. Make sure all the legs are pulled out completely, locked in place, and it sits evenly. To ensure the tripod is level, check the bubble level on top. The bubble should be centered within the circle.
- Open the bottom right cubby. WITH BOTH HANDS take out the camera. Attach the camera to the tripod with the screw located on the top of the tripod. Make sure it is screwed tightly with the grey adjuster nut before letting go.
- In the same cubby as the camera (bottom right) grab the power cable and plug into the camera. Plug the other end of the power cable into the surge protector. Grab the camera cable (SDI) off the back of the TV on the right side of the mobile cart and plug it into the camera. Make sure it is locked in. Open the lens shutter and the viewfinder. Push the switch located on the top left of the camera to “camera” mode. (NOTE: If you need help to know where to plug things into or where things are, look at the quick start photo guide).
- Go back to the Zoom panel and put in the Zoom information and join the meeting. On the Zoom panel go to “camera controls” and turn to manual. (You can’t use auto framing with the mobile cart!) Please note, If the Zoom application hasn’t opened, you will need to get the mouse out of the bottom right cubby, and the keyboard from the top left cubby and search for the application on the computer.
- Grab the microphones needed for class out of the bottom left cubby. Put the batteries into selected microphones.
- Perform a site check with all the microphones you will be using for class.
- Double check to make sure that ALL distant sites can see and hear you (including those on Zoom). Also ensure that you are able to move the camera around smoothly on the tripod.
Room Take Down
- Get the mouse out of the bottom right drawer. Get the keyboard out of the cubby on the top left side of the cart.
- Shake the mouse until you see an “exit” button on the bottom left side of the Zoom Room screen. Click the “exit” button and type in the password – “mobile”. The screen will then show a computer screen. Locate the window icon and click power, then shut down. After you get the computer shut down, put the keyboard back in the top left cubby. Make sure to power off the mouse before putting the mouse back in the bottom right drawer.
- Turn off the camera and close the lens shutter. Close the view finder and unplug all cables (camera cable (SDI) and power cable). Close covers and carefully unscrew the camera. WITH BOTH HANDS, place the camera back in padded drawer on bottom right. The camera gets placed with strap facing pad and camera lens facing left (away from TV screen). Put the power cable in the drawer.
- Fold up tripod and put in bag. Hang on the back top left of the mobile cart.
- Unplug the black ethernet cable that is attached to the back of Zoom panel from the mixer. Wrap loosely around touch panel. Unplug mixer from surge protector. If the power cable attached to the mobile cart is still plugged in, unplug the power cable. (Double check to make sure the computer is shut down before). Unplug surge protector from wall.
- Take the touch panel, mixer, surge protector and put it into the bottom left cubby. Go get the microphones and take out all the used batteries and place them on top of mobile cart. Put microphones back in the pouches and place them in the bottom left cubby. Lock up the cubby.
- Unplug the ethernet cable that is attached to the mobile cart from the wall. Use the over-under method and attach it to the back of the mobile cart on top right of TV using the Velcro strap located furthest to the right. Grab the camera cable (SDI) and do the same thing. Place it in the same Velcro strap as the ethernet cable. Grab the power cable and do the same but attach it using the Velcro strap on the left side.
- Make sure all the drawers and cubbies are locked and then push the mobile cart back to the closet (Room 138) and put it away exactly as you found it. Make sure to lock the door and take the batteries and keys with you.
-
Return the keys and batteries to DE 101.
Autoframing
Because of the way the cart is set-up, the camera setting for autoframing does not work. Please be sure to turn off autoframing when setting up the cart.
Cable Management and Upkeep
When putting the Mobile Cart away, please nicely and loosely wrap up the cables and return them to the cart. Please use the Over-Under method of cable wrapping when doing this. Please take the time to turn this wrap when working with the mobile cart. It will help keep all of the cords nice and increase their lifespan. Also, do not step on any video or network cables if at all possible. Please also take care to leave some slack when plugging the video cable into the camera and if you are plugging any laptops or other devices into the cart.
Network Port Locations:
Gym: On the left side of the white box in the rack. There is a black arrow pointing to the correct spot.
B134: The network port is in the middle of the wall above the counter located at the front of the classroom (where the whiteboard is).

Video
This video is for helping you refresh your skills. Please note that if you have not facilitated the mobile cart, you will need to be trained in person prior to facilitating.
Known Issues
To mute the mobile cart, you must turn the volume all the way off.
Be sure to not join audio! Even if audio is not joined, they will still be able to control the volume for the video using the volume controls on their computer.
If the camera stops working, follow these steps on the Camera's screen menu:
Function -- Menu -- Setting (wrench icon)
Then, make sure that the settings match with these:
- OUTPUT:SDI
- OUTPUT RESOLUTION: 720p
Additional Information
EBLS 134:
EBLS GYM:
Location:
On This Page
Quick Facts
| Room Type: | Mobile Cart |
| Codec: | Zoom Rooms |
| Student Mic: | Handheld |
| Facilitator Ctrl: | Zoom Rooms |
| Doc Cam: | N/A |