General Overview of ECC 216:
The Eccles Conference Center Auditorium, or ECC 216, is a room that has been outfitted to provide a broadcasting environment that is fully customizable and utilizes a lot of similar technology that we use as facilitators around campus. Please take note that this room will take some getting used to and some practice. We hope that this page will help guide you through the basic operations of the room, and that you learn to use the equipment found in the room wisely.
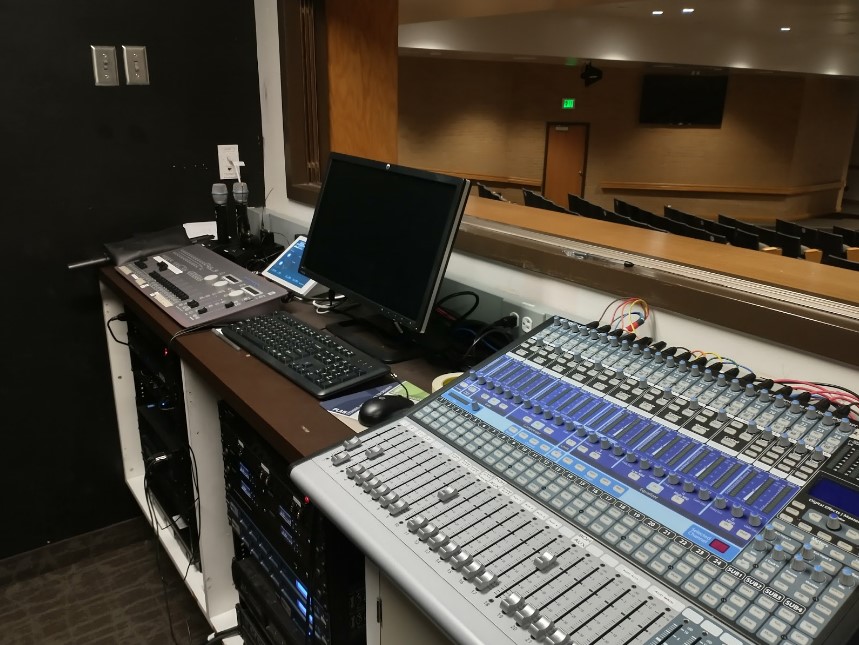
This room is a bit different than most of our other IVC Broadcast rooms. The booth, which is in a small room near the back of the auditorium called the Booth. This is where you will be posted during your classes. In this room, you will find a computer that you can log into for zoom and signing in, a large mixing table that controls microphones and speakers, a Touch Panel, and some other equipment that we will NOT be using. We will briefly discuss the functionality and controls of the touch panel located in this room.
You will find a touch panel on the podium on the stage of the auditorium. We encourage you to not use this Touch Panel. This only has a select few functions compared to the one in the booth, so overall it will be better to simply use the touch panel controls located in the booth. There will be a built in microphone on the podium that can be used and controlled, as well as a plugged in laptop for teachers to use as well. (There will not be an Instructor PC in this room)
Touch Panel Controls:
On the touch panel, along the bottom, you will find the projector power button, the AV Mute (projector mute) button, and the monitors power button. Use the power buttons to turn on the equipment when needed. There is also an Audio Mute button, but we will be using other means to mute audio if needed.
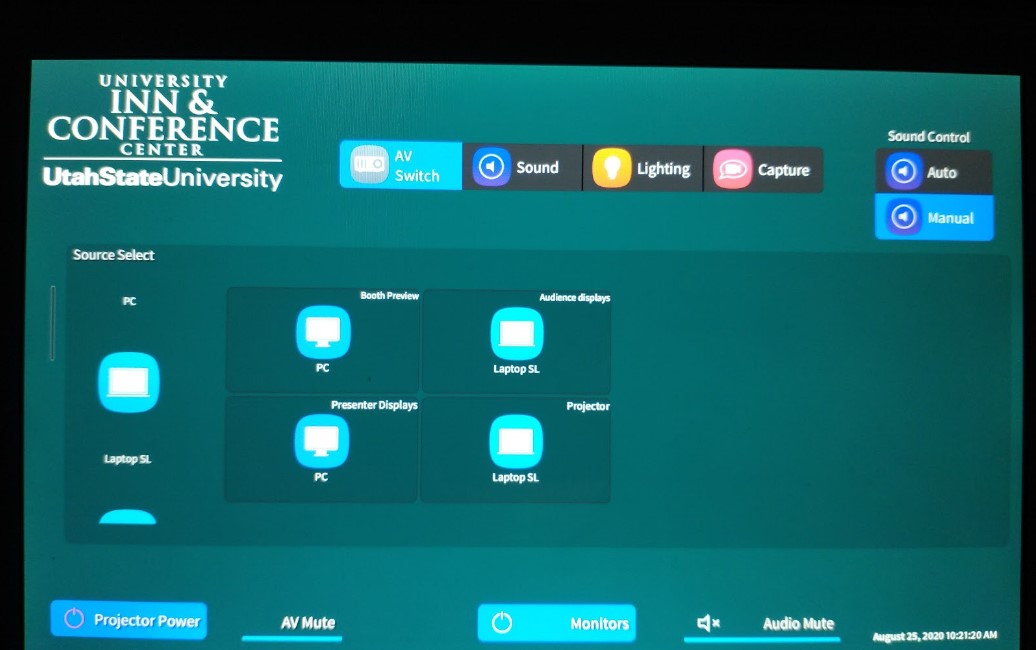
You will notice that there are 4 main tabs, AV Switch, Sound, Lighting, and Capture. We will go through each tab systematically to explain what they do.
The AV Switch:
This is where you can change the sources of the different monitors around the auditorium. Just like in Huntsman Hall Classrooms, you will click to drag and drop the sources into the respective box representing the different monitors around the room.
Sound:
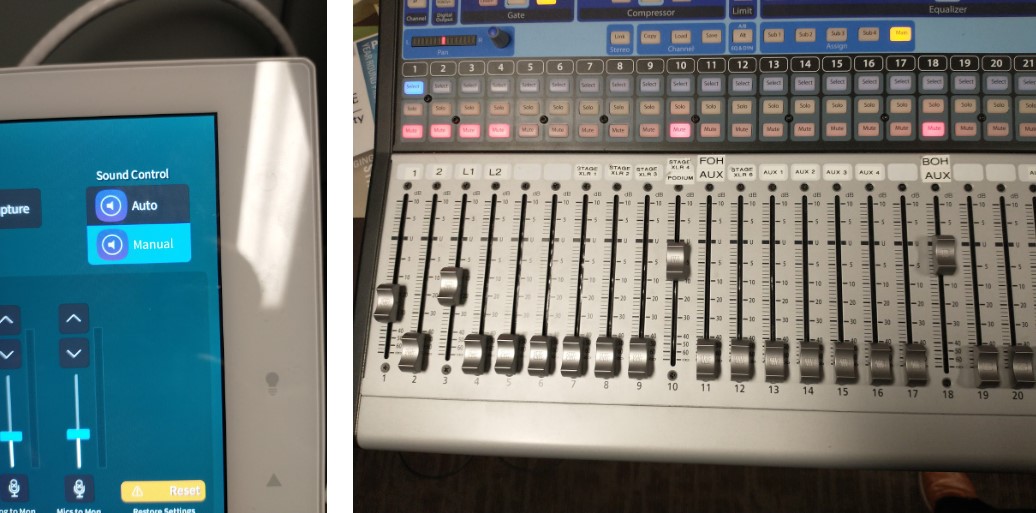
This will let you adjust the volume controls of the microphones located in the room, but it is important to know about the Sound Control button in the upper right hand corner. While facilitating in this room, you will need to make sure that the Sound Control is set to Manual. When we do this, it allows computer audio from the “Facilitator” computer to play through the room. Instead of using the touch panel sound board, you will be using the actual sound board.
All you need to use on the sound board will be the dials 1, 2, 3, 4, 10, 11, and 18, as well as their respective mute buttons located directly above the dials. The Dial on the very right hand side is the Master Volume Dial, which should always be set to the "U" level unless otherwise needed. Dials 1 through 4 are the wireless microphones, with Dial 10 representing the podium microphone. Dials 11 and 18 are used when you want to share computer audio from either computer in the room. Dial 11 (FOH AUX, or Front of House Auxiliary) represents the volume controls for the Instructor laptop located on the podium on the stage. Dial 18 (BOH AUX, or Back of House Auxiliary) represents volume controls for the “Facilitator” Computer in the booth. Like a volume switch, the higher up the bar, the louder the volume (either incoming PC audio or Microphone volume levels). There will be a mute button located just about the dials. When the mute button is red, that source is muted.
DO NOT TOUCH OR MESS AROUND WITH ANY OF THE OTHER DIALS AND BUTTONS ON THIS MIXER. The Dials should never be raised higher than the "U" Level, unless needed for special reasons.
Special reason #1: We have noticed that sometimes professors have a hard time hearing participants in the Zoom call. If this is the case, you can bring the BOH AUX Dial 18 up past the U level to NO MORE than the level marked 5. If you do this, you will need to adjust your instructor's microphone level down to prevent the speakers and the microphones creating a really bad audio echo/screech.
On the actual mixer, there is a power button located on the back of the device on the bottom right hand corner if the device is ever turned off. Flip the switch to turn it on.
Lighting:
This controls the lights in the auditorium. The auditorium has been outfitted with a plethora of different lights and controls. As a facilitator in this room, you will only need to use the lighting presets found on this tab. You will want to make sure that you have Touch panel control, which allows you to control the lights and use the presets from the touch panel. You will have stage lights and house lights which control the stage and the audience respectively. We invite you to learn these presets and how they affect the room. Communicate with your professor to figure out which lighting options they would like to use for their class.

Capture:
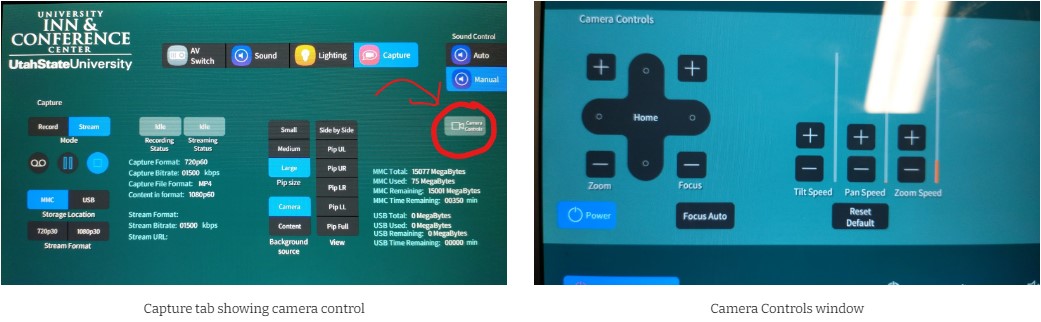
Finally, this controls are where you will be able to find the camera controls. There is actually a button labeled Camera Controls in the upper right hand corner on the Capture tab that must be selected before controlling the camera. All the other buttons and settings on this tab are irrelevant and have no purpose for us.
The Camera Controls window is simple to use. You will find the controls on the left hand side of the screen with zooming options and focus options. You will also notice the Camera Power button located in the bottom right hand corner and the Focus Auto button next to it. We'd Recommend using the Focus Auto button to prevent blurring camera problems, but you can manually change the focus if needed. You can also control the speed at which the camera will pan and zoom by using the correctly labeled buttons. There are also presets on the right hand side. These presets will be a big help to you as you help facilitate courses in this room.
In order to return to the main screens of the Touch Panel, make sure to click the X in the upper right hand corner of the camera controls window to exit.
The Booth computer will be used to log into the Zoom call and control the media. You will log into the computer with your A-number and password. The laptop up front will be used by the professor when they want to share presentations and videos. If there is a Zoom call, you will have to help the professor sign into the Zoom call in order to share the laptop screen with the Zoom call.
You will find the wireless microphones located in the back left corner on top of the desk where the computer is in the booth. They should be labeled, but make sure that whatever microphone you use, remember to control it using the actual mixer.
Sharing Videos in ECC 216:
The Standard Plan:
When sharing a video in this Room, whether it be over Zoom or just for the Face to Face students, You will normally want to share the video from the Instructor laptop, which is located on the podium on the stage. If the professor you are facilitating for wants to share a video from the laptop, you will need to follow these steps:
- Prepare the sound system to share a video from the laptop. You will do this by lowering the BOH AUX Dial 18 and increasing the FOH AUX Dial 11. This will reduce the noise coming from your back podium "Facilitator" computer, and increase the volume of the Instructor Laptop where the video will be presented.
- ZOOM: If you are doing this in Zoom, this will make it so you will not be able to hear the Zoom participants while the video is being played. You will hear the Zoom participants again when the BOH AUX Dial 18 has increased
- WARNING: The FOH AUX Dial 11 is VERY Sensitive and will become VERY loud if turned up too high. . You will not need to push it much higher than what is shown in the picture shown on the left.
- Once you have shared the video, return the FOH AUX Dial 11 back to the lowest setting and/or mute it and increase the BOH AUX Dial 18 again to its original level.
The Backup Plan:
We have noticed that the Standard Plan has the occasional issue. If the Standard Plan is not working for you in your class, you can use the backup strategy found here:
-
If the professor would like to share a video, but the audio is not working from the laptop, you can use the Booth PC to share the video within the Zoom call and/or auditorium. Simply find the video the professor would like to share, pull it up on the booth computer, and begin playing the video. Make sure that if you do this that the Booth computer is properly shown in the room for the students attending in the auditorium and if you have a Zoom call as well, to share the screen with the Zoom Participants. (making sure that "Share Computer Sound" and "Optimize Screen Sharing for Video Clip" are both enabled.
-
Adjust the BOH AUX Dial 18 according the volume of the video in the auditorium and in the call.
Basic Checklist when facilitating in the room:
-
Log into the back computer and open up the zoom meeting (you'll need the meeting id and password from the Professor). You will need to share computer audio in that room, because all of the microphones are connected up to that computer.
-
Prepare the screens and adjust the sources if needed
-
Prepare the microphone and give it to the instructor, knowing which microphone they will be using so you can control it from the booth if needed.
-
If you are using Zoom, please run the Microphone and Speaker test to ensure that the you can hear zoom and that zoom registers your microphone inputs.
-
Help the professor set up the laptop up front or help them connect their own personal laptop. If you are connecting up to zoom on that laptop as well (for chats and sharing content), Make sure that you have the Computer audio disconnected and that the microphone and video are muted to prevent a really bad feedback loop.
-
Adjust the Lighting as needed and Prepare the camera
-
Confirm with the participants in the Zoom call that they can hear and see the professor and if they can see the presentation if there is one.
Helpful Room Hints:
-
Be in constant communication with the instructor.
-
Make sure to pay attention throughout class. You may need to move the cameras, adjust the microphones, help with the laptop up front, etc. at any moment's notice.
-
The booth projects sound very well, so remember to be quiet and to keep your volume down while you are in the booth.
-
The source labelled "Laptop SL" is the source to show the laptop on the podium
-
The source labelled "PC" refers to the PC in the booth that you will be controlling.
-
The Presenter Displays will not turn on with the Monitor power button. You will need to turn these on manually by clicking the power button on the left hand side (Looking at the TV from the back).
-
You will find the whiteboard in the alcove on the right hand side of the stage (looking at the stage).
-
If needed/wanted, connect the laptop up front to the Zoom call. This way the Professor/TA can monitor chats during class and they have an easy way to share content within the call.
Known Issues
N/A
Additional Information
Classroom View:
Location: